Wednesday, October 5, 2011

bee block roundup

It's been so long, I think I've forgotten how to blog!

Yes, I made it back from New York, and the trip was a lot of fun. The 'Quilters Take Manhattan' event was interesting, and it was a hoot to watch Mark Lipinski and Jay McCarroll interact. I was too shy to actually speak to either one of them after the talk, much less get my picture taken with them!! But here's a crummy picture I took while they were doing the interview. That crazy outfit on the right was something Jay made in college, and it's what he submitted as his 'representative' piece to go along with his interview.


He also showed a bunch of patchwork clothes he had made, modeled by members of the Alliance. Beautiful!


Since that trip, I've been crazy busy - catching up on work, getting the kid started in kindergarten, finishing a big quilt (more on that later!), getting ready for quilt retreat (it was awesome! more on that later too!), and so much more. I've been keeping up with my do. Good Stitches bee blocks, and here's a round up of the ones I've made over the last few months:

Lollipops for Des. Here's the completed quilt. It's fantastic!!! I had so much fun making these blocks that I made like 3 times as many as I was supposed to. Maybe that's a sign I should make a quilt like this myself!


'Houndstooth' blocks for Lydia - these were fun to make! No finished quilt for this one yet...


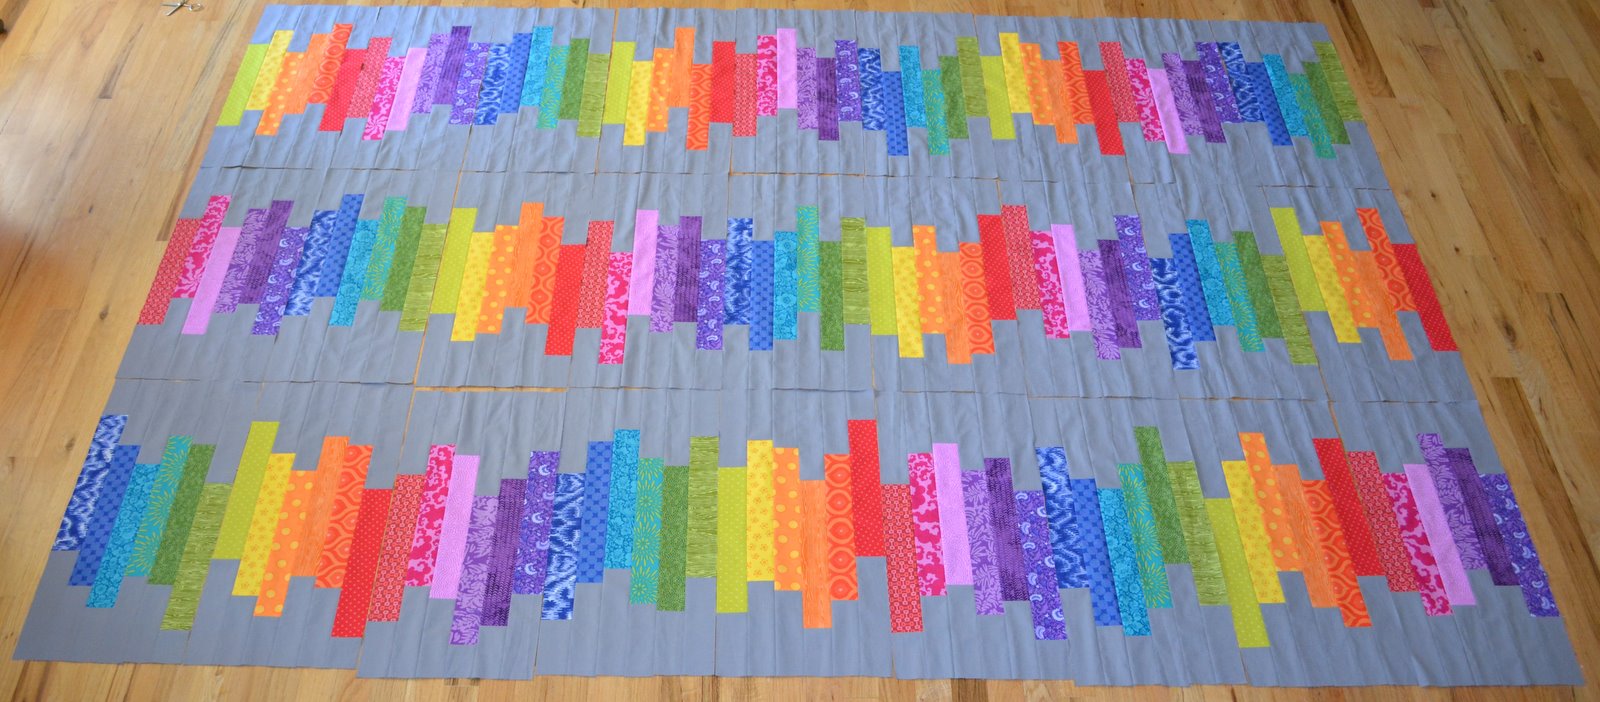
'Citrus sails' for Lyanna. Looks like it's almost done!


Character blocks for Melissa. She's going all out to make 4 quilts for a family in need. Here's the first completed top.


Holly's purple/orange/gray blocks for last month...


The beast - a swoon block for Rachel. This block annoyed me in so many ways, from its size (24" square) to its complexity to the amount of fabric it required. The fabric requirements were very specific (big prints, in tomato red, slate grey, dark blue and light blue), and I had exactly one red fabric that I thought would fit. Problem was, I had only a 16x20" piece of it when the pattern called for a fat quarter!! Right. Switching out the normal flying geese for the no-waste method helped, and I just squeaked it out. But I was afraid the whole time of screwing it up... not fun! On the up side, I'm sure it will be a lovely quilt. Here's a collage of the other blocks so far.


I'm up for the Inspire circle for October. I chose this framed scrappy 16-patch block. It was so much fun to make (and I do love to use up scraps!) that I might just make another quilt like this for myself some day!


My plan is to make the quilt bigger (since Project Linus seems to always need more twin-size quilts for the older kids) by adding solid blocks of big colorful prints. I can't wait to put this one together!!


Okay, that's all the blocks. Yay! Next post, quilt retreat. I'm just waiting for Karen's post, so I can steal pictures. :-)

Wednesday, August 3, 2011

Rainbow quilt - done!

Hot out of the dryer - the rainbow quilt in all its colorful glory!


Hey, the back is even centered pretty decently! :-)


I decided to go safe with the quilting - stippling with grey thread to match the background. I used my poor little mini quilt to test some options, and it is such a mess now. I tried stippling with the variegated thread (didn't like it), switched to grey thread and tried a sort of loopy linear thing (didn't love it), then tried pebbles (loved it, but it would have taken FOREVER). So, safe boring grey stippling won. And later, I will be spending several weekly conference calls picking out all that test quilting... I *will* have my mini quilt eventually!

I started off thinking of using some sort of rainbow stripe for the binding. But I couldn't find a fabric that was exactly right. So, I went with a scrappy binding made from a subset of the rainbow fabrics. Oh, I think it's awesome!!


How about some more glamor shots? I love how stippling always looks so much better after you wash the quilt - the imperfections just fade away...


Okay, just one more of that lovely binding (hand-stitched this time!) ....


I'm really thrilled to have this done. In two days, I will be flying to New York City for some work meetings, and I will be giving this quilt to Q, my dear friend and coworker. Q lives in Christchurch, NZ, which has been badly damaged by earthquakes in the past year. While Q and his family haven't been as severely affected as many others there, they've still had a lot of upheavals - Q is working from home full time because his office building was condemned (he hasn't even been able to retrieve anything from it since the earthquake!), several houses in his neighborhood are being torn down, etc. He mentioned in passing that his young son had been having some difficulties handling things, and when I saw Deb's post about the book You, Me & The Rainbow, it just clicked - I needed to buy that book, and make this quilt for them.


Actually, I bought two copies of the book - I hope to make another rainbow quilt for my daughter someday (perhaps not the exact same design). The message of the book is wonderful - it's all about using the colors to visualize comforting thoughts and loving feelings, and connections to the people you love, even if they are far away. Even as far away as New Zealand. :-)

Oh, and speaking of New York... when the dates were set for these work meetings, I was totally stoked to find out that there was a quilting event in the city the weekend before. I tried to convince my local buddies to come out there with me, but the price of airfare was just too crazy (boohoo!). So, I'll be dragging Q along with me to the afternoon event. Now you know what a great friend he really is, to agree to that! I'm really looking forward to it! It should be such a hoot to see Mark Lipinski interview Jay McCarroll! I love them both, and can't wait to see them in person.

Friday, July 29, 2011

top done and basted

Thanks everyone for the feedback on the layout... I went with the last option (mostly because I really want a mini quilt to keep for myself!), and here it is just before I basted it. I love it!


I had a heck of a time choosing fabric for the back. The recipient is a 6 year old old boy, who loves the color red. I wanted something colorful and fun, but not too juvenile. I was really tempted by David Walker's collections, especially robots or boys will be boys, or the rocket-related prints in Sara Jane's children at play collection. But then I took one last look through my stash, and found this old (2003) Alexander Henry print of hot air balloons. I think it's almost perfect - colorful and fun, and playful but not too childish. The red borders are from a (new) IKEA sheet I had on hand. So it turns out that everything except the gray background fabric was from my stash!


And here's a lesson I learned from this quilt... I rarely press my seams open (because I'm lazy, mostly), but I did for this quilt - I didn't know what my final layout would be, so I didn't want to end up having to join a bunch of seams going in the same direction. But then I ended up having to match a crapload of open seams, which wasn't much better. I ended up with several places like this, where tiny gaps opened up at the intersections:


Ug! I went behind and sewed them up by hand before I basted the quilt, and hopefully everything will be okay once it's quilted. But next time, I'll be sure to use a thinner needle and a shorter stitch length - I think both of those would help. And no more pressing seams open for me, if I can help it!

Next up - the quilting. What would you do? I wish I had the nerve to try something fancy, but I'm pretty sure I'll just stipple it. It's quick and easy, and I know I can do an okay job with it. I picked up some variegated thread (another first for me), and I'm going to try it on the mini quilt to see how that looks...

Sunday, July 24, 2011

the next quilt

This quilt was inspired by a book mentioned in this post of Deb's over at Works in Progress. To begin, I went through my stash and picked out a bunch of fabrics that were bright and saturated, and mostly monochromatic, with not too much white. I spent WAY too much time narrowing down the prints, with helpful input from Robin, Quynh, Chara and Ahava. After much back and forth, I ended up with 18 prints, and a medium gray background.


The design was inspired by the Random Reflections quilt, though I did things a little different (trying to be more efficient, as always!). I already want to make another one, and Chara has asked for a writeup, so I'll try to do that next month.

But for now, I need to settle on the layout, and get this puppy done. I've got all the strips sewn into groups of 6, and here's the most basic layout - all the rainbows going in the same direction (let's call that A).


And here's B - pretty much the same thing, but with the middle column reversed in direction.


And here's C, with the rainbows in the same direction, but each column is staggered by one group.


Those layouts are all a little large - 66" x 95". I could change up the layout by removing one rainbow (and make myself a mini quilt with it!). This would give me 4 horizontal stripes instead of 3 vertical ones, with overall dimensions of 63" x 88". Here's D, where two rainbows go to the right, and two go to the left.


Or layout E, where they go the same direction, but each row is staggered by one group.


Any votes? Or any other layout ideas? I did consider chipping each block in half (through the "center" of the colored portions), and randomly recombining them so that the colored bits are all varied widths. But I'm afraid that might not look great, and I don't want to risk it - I'll try it on the next version instead. So, I think I'm leaning towards the last layout... It's a little smaller, but still a decent size. And I really like the idea of having a small version to keep for myself!


I asked Trudy, but she didn't have an opinion. But at least she stayed off the "design floor" while I was working on the layouts! :-)

Wednesday, July 20, 2011

back, with a finish

I know! It's been forever! I have been doing a little bit of sewing this summer, and here's a recent 'big finish'.

I've been a member of the do. Good Stitches bee for the last 9 months or so, and have been having fun being a stitcher, making blocks for the Faith circle. A couple months ago, I also joined the Inspire circle (making quilts for my favorite charity - Project Linus), but this time as a quilter. Being a quilter means you get to choose a design, collect the blocks and assemble the quilt. My month was May, and I chose this beautiful quilt by Amy of Diary of a Quilter as my inspiration:


To make up for all the girly and toddler quilts I usually make for Project Linus, I wanted to make something for an older boy. I asked for blue and brown square-in-square blocks, with a touch or green and gray. They were to be either 12.5" or 6.5" square, or a mix of the two sizes. The members of my group made some really wonderful squares for me! To make it a larger quilt (those teen boys are big!), I made the equivalent of 7 more blocks (though most of them were 6.5" blocks, so let's say 2 big blocks, and 20 small ones). The final dimensions were about 54" by 72". It was pretty addictive to go through my scraps and stash, and to use fabrics I wouldn't normally pick out or put together. What a great stash-buster project!


As you can see, my layout is a lot more regular than Amy's was. I tried to do a random layout, but I just couldn't get it to look right! So, I gave up, and went for a more regular one. With all the variety in the blocks, it still looks pretty random! Many thanks go to Chara for helping me with the layout!

For the back, I used a large piece of this fantastic Katie Jump Rope fabric. I had picked it up at a Project Linus meeting, long before I planned this quilt. It was perfect! I bordered it with a medium gray - it doesn't quite match the lighter gray in the KJR fabric, but close enough!


I based the quilting on the diagonal print of the KJR print. After basting (using spray basting, as usual!) I took a kid's washable marker, and used a ruler to extend the diagonal lines into the border fabric. After that, I quilted it from behind. I've used this technique before, and I highly recommend it. It's super quick, and looks great from the front.


Sorry these photos kinda suck - I finished the quilt the morning of our monthly meeting, and was in a rush to get the photos taken so I could run off to donate it!


I wanted to do something special for the label, more than just the standard tag. The text reads "This quilt was stitched with lots of love, especially for you, by the members of the "Inspire" circle of the "do. Good Stitches" bee on Flickr.com, May 2011. We hope it keeps you cozy!"


I'm also pretty darn proud of myself for finishing it on time - the bee rules say you should finish the quilt within 30 days of receiving all the blocks. I think I got my last block in the middle of June, and the quilt was donated on July 10. Yay for me!!

Saturday, April 30, 2011

finding my lost mojo

Oh, my poor neglected blog!

It's been a whole month - I had a work trip, followed immediately by a visit from my mom and sister for Vada's birthday, and then I had to catch up on work... It was just one thing after another! For a few weeks, the only sewing I managed was this birthday outfit for Vada, just another appliqued t-shirt and circle skirt. (Yes, I am a one-trick pony!)


Isn't she a cutie, though? It's the only year I could give her a "V" shirt (V being the roman numeral for 5 - get it?). It doesn't take much to amuse me! I love how her outfit matches her new bike - not planned at all.


So, after life settled down a bit, I tried my usual trick for getting back into sewing. I took the old two-page list of UFOs and TODOs, and rewrote it.


Somehow it still ran over to two pages! Drat - I'd better get busy!


Still not motivated, I moved onto trick number 2 - an easy sewing task with a hard deadline. These are my blocks for the April "Faith" circle in the do. Good Stitches bee. I loved the rainbow theme, and I really loved the freedom to make blocks in whatever size we pleased. I was having so much fun, I made 3 blocks instead of 2. They are simple designs, but I guess that's just my style!


So, that's one thing to cross off the new list! Yay! Now I need to get cracking on blocks for the second circle I joined - the new "Inspire" circle for Project Linus quilts. Next month is my turn to be the quilter for that circle, so I get to pick the theme. I'm a little nervous about it, but I think I picked something fun and flexible, so hopefully it will go smoothly.

Thursday, March 24, 2011

my new friend - FOE

Have you ever used FOE (fold over elastic)? I'd been mildly interested, but I don't really sew enough clothing to justify ordering any. Then I saw some at the sewing expo a few weeks ago, and was sorely tempted... and when I saw the "remnants - all you can stuff in a bag for $10" bin, I fell for it. I think I scored a great deal - I got at least 45 yards, of several different widths and colors. Plenty to play around with now!


My first attempt to use it was for this simple circle skirt for the kid. Happy St. Patrick's day! I followed the basics of the MADE tutorial (could not be any easier!). When it came time to do the waistband, I cut a length of FOE about the same length I would for normal elastic if I was using a casing. I pinned it at 4 places, and stretched the FOE as I sewed it down with a zigzag stitch. Super easy, super quick!


The only problem is that it somehow turned out WAY too big! I wasn't about to redo it (me? rip out zigzag stitching? not on your life!), so I just made two really ugly tucks on the sides. On the upside, it will be really easy to let those tucks out, so this skirt should last for *years*! So I guess the stitching makes it so that the elastic doesn't un-stretch all the way back once you've sewn it down. Is there some magic formula for how much shorter you should make it? I guess I can answer my own question - for about a 19" waist, I had to take up about 4 or 5". So, about 25% less. There you go.


I did look around youtube to see if there were any videos about how to use FOE. I found a few, but nothing about how to measure it to fit a waistband. I loved the Angry Chicken video, but even hers didn't say anything about it. Oh well, I'm okay with trial and error!

And speaking of other new things to try - what do you know about laminated cottons? I picked up a couple of these remnant pieces at the expo ($1.50 each, for two extra chubby fat quarters), but they curl up like crazy! I can't imagine trying to sew when the fabric is like this. Especially for a laminate - aren't you supposed to avoid using pins? Any hints for how to get them to lay flat? I tried to press them, but it just seemed to make it worse. Should I wash them, or throw them in the dryer? Any other advice? I'm not even sure what I'm going to make with them, maybe snack bags?