Tuesday, February 22, 2011

loot, and someone else's WIPs

It started off innocently enough.... Another stash sale + a few free hours on a Saturday morning = me suckered in...


"Lucky" and "ecstatic" were overstating it a bit! There was the usual collection of "stuff" - some okay fabric, some crap fabric, some rulers, some bags of scraps, etc. I was chatting up the seller, and she said she had tried out quilting a few years back, and had taken a few classes, but never really got into it, so she was getting rid of everything. There were a couple quilt tops, and I suggested that if she wanted to donate them, I'd quilt them up and give them to Project Linus. She had never heard of the organization, but immediately said yes (I later learned she was a nurse, so no wonder!).

Then she asked if I knew anyone who could do some quilting for her, as she had one quilt top left that she loved and wanted to keep. I told her I could certainly ask around and find someone for her. She ran inside to get her card, and came back with the quilt. It had obviously been a while since she looked at it, because it turned out it had already been professionally quilted and trimmed up, and all it needed was binding. The words "Well, gosh - I can do that for ya!" were out of my mouth before I knew what I was saying! I was holding a little stack of fabric that I had picked out, and she asked if I wanted to swap that for the labor. Um..... Oh, what the heck! Sure. But then I was kicking myself all the way home. Was it really worth my time to bind a quilt for a few yards of fabric? Oh well, I would consider it a 'random act of kindness', and it would be all good.

And look how pretty her quilt was! After 5 years of WIP purgatory, it totally deserved to be out of that plastic bag and put to use!


It was about 72" square, and there was some of the border fabric in the bag with the quilt, so I just used that for the binding. Thankfully she was okay with having it machine stitched down in the back (no way I would have agreed to hand sewing - I'm not that crazy!), and it only took me about an hour and a half to get it finished. Yay for me! I should totally add this to my big list, just so I can cross it off! Finishing someone else's WIP should count! (Maybe double!) :-)


Later in the afternoon, I trundled back up to Woodinville to drop off the quilt. She was so pleased to have it back so soon, and she loved it! Yay!

You know that old saying 'no good deed goes unpunished"? With her garage sale over, she asked if I would like to take home all the remaining sewing stuff, to use or donate. And of course, I can't pass up an offer like that! It took me quite a while to sort through it all. But in the end, I ended up with several bags of non-cotton fabric to be donated or freecycled, plus all this loot:

A medium-sized cutting mat, some small rulers and a bunch of thread...


A small basted quilt (or table topper or wall hanging, maybe?), which I might donate to Project Linus (the colors aren't very child-friendly, so maybe not)...


A basted table runner. Not sure what the heck I'll do with this. At least the colors are more cheery. Maybe I can add some borders and turn it into a small quilt? There are some scraps of those fabrics left, but I'm not at all interested in making more of those blocks!


A mostly complete xmas-themed top (just needs some borders), about lap size. Definitely colorful enough for a PL quilt!


This flannel WIP, which I'll probably go ahead and finish up to donate. It has all the pieces, just needs a little more piecing. I do not love these colors, but it should be warm and snuggly anyway.


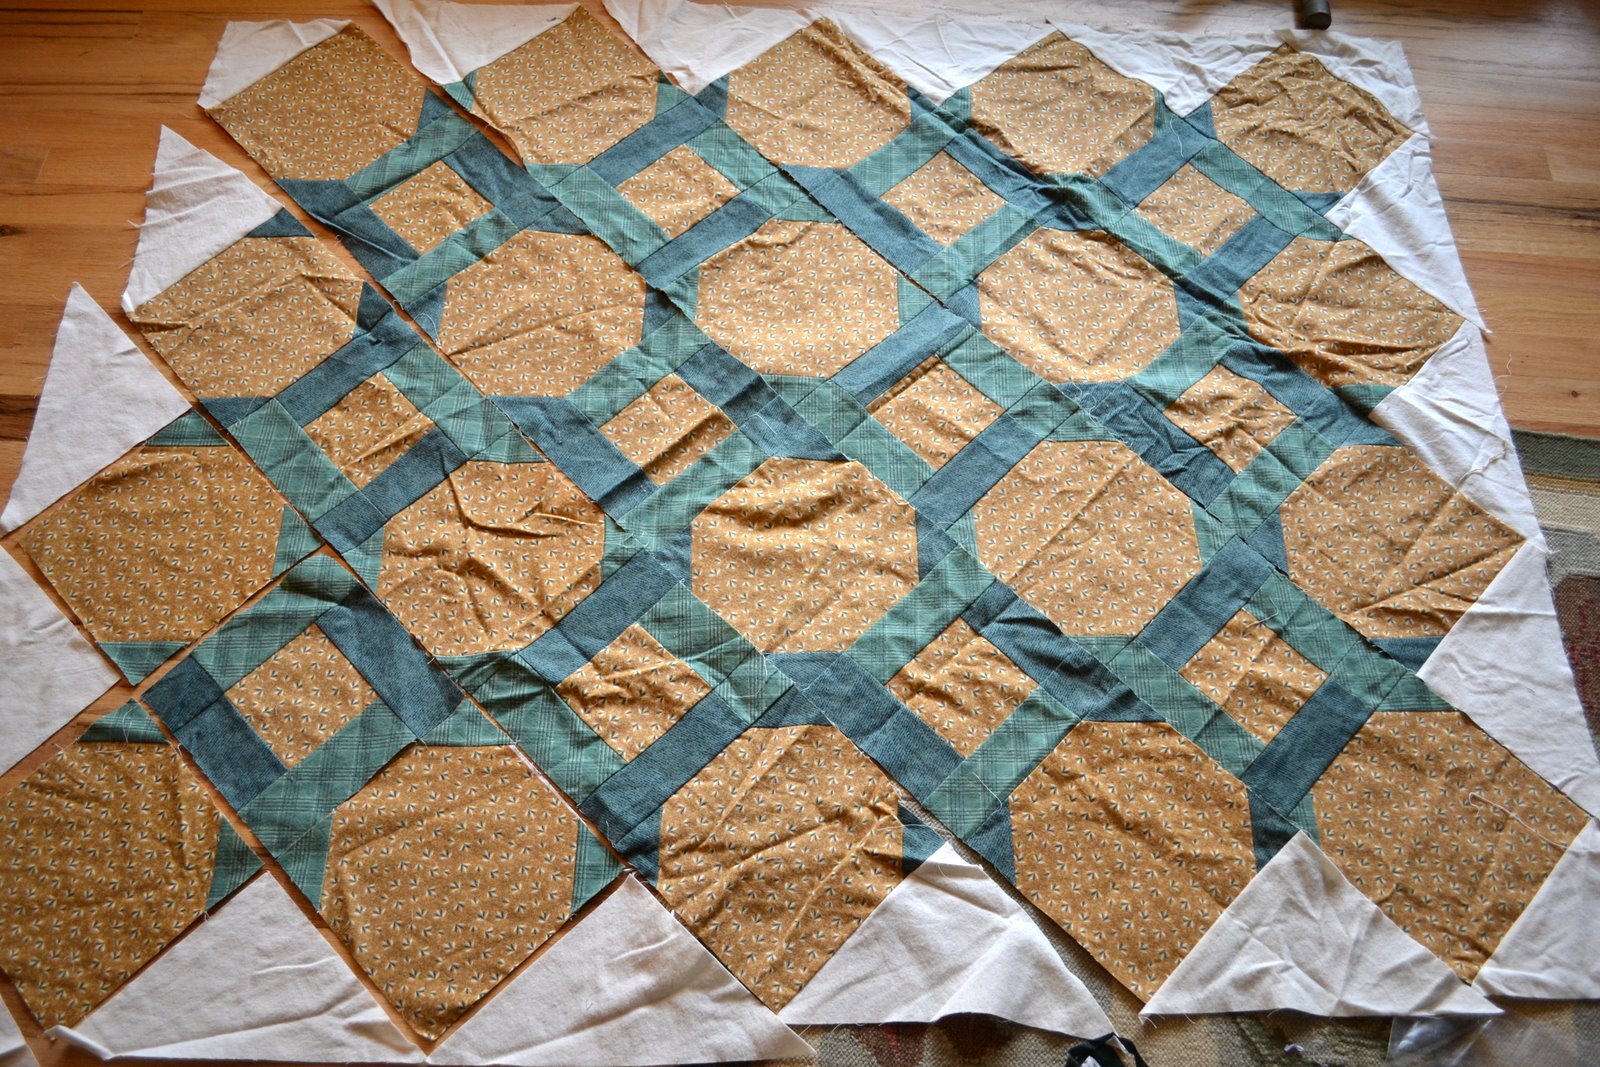
This WIP has a LOT of blocks, and only a few are sewn together. Again, I don't love the colors, but maybe it would be okay for an older boy. I'm not sure I want to spend the time it would take to finish this one up, so I might try to pass it off to someone else...


This project was either a kit, or only taken to the cutting stage. One block was finished, and one block was started, and that was it. I think it would be a piece of cake to turn this into a different design, like maybe a coin quilt. And it sure is colorful!


And lastly, some fabric. Some yardage of flannel...


And a bunch of fat quarters of flannel and a little homespun. There are multiples of each print, and I'm not sure they were meant to go together, so I'm not sure what to do with them.


Some coordinating FQ's...


And a pretty piece of silk.


Phew... Almost done. I'll spare you the photos of the stack of random fabrics and scraps, and show you just one more thing. There are 12 of these Trapunto blocks...


They are about 12" square, and each bird is outlined and stuffed. I think there are 2 each of 6 different scenes (or maybe 3 each of 4 scenes?).


I can't see these being used for a Project Linus quilt, and I won't use them myself. But I hate to think of all that work being wasted! So, if you want them, just leave me a comment! I'll even spring for the shipping (US only, please) to get them to a good home. :-) On the off chance that there's more than one taker, I'll draw a name in a couple days.

Thursday, February 17, 2011

the winner, and another strippie

The lucky winner of the pink charm squares is #40, and that's Sue of Sue's Quilting Haven. Looks like she's been having quite the winning streak lately! I was pleased to see the Project Linus badge on her blog - it's always nice to meet another 'blanketeer'!

And speaking of which (and just so I don't have a post without pictures!) here's my latest PL donation quilt, which I finished last month. It's the second 'baste as you go' quilt that I started back in July. I wish I had paid attention to the repeat on the focus fabric when I put it together, but it's hard to see the overall pattern until you step away from the quilt. Oh well! I'll know to keep an eye out for that next time.


This is the fifth Quick Strippie quilt I've made, and I have 4 more in the works (they're on the big list!). They are just so easy to make!


And of course, my usual big crazy patchwork backing. Also fun and easy to make, and a great use for random scraps of novelty fabrics!

Wednesday, February 16, 2011

hanging my minis

I hate to admit, but I've never hung a quilt before. I was so thrilled with my new wall hangings, and really wanted to get them up. I had this idea in my head that involved covered buttons (shank removed, glued to thumbtacks), twine and clothespins. In my head, it looked adorable. In practice, not so much....


But then I remembered this wacky lady named Nan from Pots & Pins, who 'fessed up to stapling her quilts to the wall. If she could use staples, why not thumbtacks?? I just gently pushed the tacks through the quilt, and it worked great!

Here's a couple different styles for ya. We've got some kinda big buttons that match the binding...


And some small buttons that match the background, so that they are almost camouflaged...


And some fun and contrasty buttons (I was too lazy to run upstairs to get actual fabric from the quilt, and that red polka dot was at hand)....


For the long wall hanging, I thought I'd try a cleaner look. I had sewn little triangles into the backing (not knowing how I'd eventually hang it), and so I tried putting the buttons in there.


That worked okay, but was a little bulky (and why waste a pretty button where no one will see it?), so I pulled out the button-tack and just used a plain old tack instead. Works great!


I love it! So easy and so quick. I do realize that the tacks might eventually rust or pull the fabric or whatnot. But I'm cool with that. The instant gratification is worth it. :-)

Tuesday, February 15, 2011

valentine's day project #2

Another new project that wasn't on the list... When I saw this cute wall hanging over at Nostalgic Cafe, I knew I wanted to make one. I had some 5" squares left over from my pink triangle quilt, and thought they would be perfect! I cut them into 2.5" squares, and used one of each print to make this little cutie!


The only bad thing was that I now had 3 more squares of each print! Following my new "create no UFOs" rule would mean tossing the extra squares into the scrap box. I couldn't bring myself to do that, so I went ahead and whipped up 3 more hearts (they don't take as long as you would think!), and sashed them together to make another wall hanging... In this shot, I have it laid out on the cutting table while I mark the diagonal lines (using one of the kid's washable markers - works great!).


I love how they turned out! For the little one, I used stippling in the white areas (dense in the heart area, more loose around the edge), and just some simple diagonals around the heart. I think this one will end up in my sewing room!


For the long one, I did an all over cross-hatch design.


This one will be hung on the narrow wall in the hall by the guest room. Probably year-round, until I can make more wall hangings to swap it out with! It's not TOO valentines-y, right?


And guess what... I still have more 5" squares left! To celebrate the finish of this mini project, I'd love to give this 'charm pack' to one of you. There's one each of 30-ish prints (a couple more than I used to make the wall hangings). Of course you don't have to make the same project that I did - it would make a cute little patchwork quilt for a baby girl!


Just leave any old comment (and I'm happy to ship international). I'll pick a winner on Thursday night, so hopefully I can get it in the mail on Friday! Yay for finished projects!!!

Monday, February 14, 2011

Happy valentine's day!

I've amended my "no new projects" resolution. I'm still working down my list, but I'm also making room for small diversions. Sometimes you just gotta have a little fun! So now my rule is "no new UFOs". If I want to start something, I have to commit to finishing it before I move on to anything else. This way, when the little missy asks for a new skirt for Valentine's day, I can say sure, why not!


It's just a simple gathered tiered skirt with an elastic waistband. I did the ruffles with the serger by increasing the differential. I first tried it with some el-cheap-o fabric, and set the differential to 2, which made it gather about 100% (42" wide strips gathered up to about 21"). For the test skirt, I used seven 6" strips to make a 3-tiered skirt - the top tier was one strip, the second tier was 2 strips, and the third tier was 4 strips long. It was really, really twirly! For the real skirt, I decided to start a little smaller so it wouldn't end up quite so voluminous (and because I only had a yard of fabric, so I only had 6 strips instead of 7). The top tier would be 3/4 of a strip, the middle tier would be 1.5 strips, and the bottom tier would be 3 strips, for a total of 5.25 strips, giving me a little fabric left over for a comfortable margin of error. But even though I set the differential to 2 again, it somehow gathered more loosely than the first time!! What the heck? Oh well - it somehow worked out perfectly so that I had enough to make 4 tiers instead of 3, with about 12" left over. It could be twirlier, but it's good enough. And it's a little long, but that just means she can wear it next year, right? :-)


I picked up the solid shirt at Target a long time ago, and was so pleased that the color happened to match perfectly. One big appliquéd heart later, and her outfit was complete (and total pink overload!!).

Monday, February 7, 2011

bee block round up

I haven't posted my bee blocks in a long time! First up, here is the last round of blocks for the vintage sheet bee...

For November. This is going to make a such a pretty quilt! And the block was not as difficult as it looks. (Here's a link to the tutorial, if you want to try the block yourself!)


December - time-consuming, but kinda cool!


January - my first ever "representational" block! It was a lot harder than I thought it would be. It takes a whole different way of thinking about putting things together!


And finally, for February. I love the look of these blocks, but honestly they were such a pain in the butt to make. And I felt like I was always trimming, trimming, trimming - more fabric got thrown away than was left in the block!


And here are my blocks for the do. Good Stitches bee... (i'm so petty - every time I have type that name out, the kreativ punctuation drives me batty!)

Anyway, here's the November block... You should click over and see the final quilt here. It's gorgeous!


And the December blocks. Nice and simple, yay!


The January block... I was glad that I already had experience with this block! I loved picking out the fabrics for this one.


Okay, I'm all caught up now, whew! :-)